
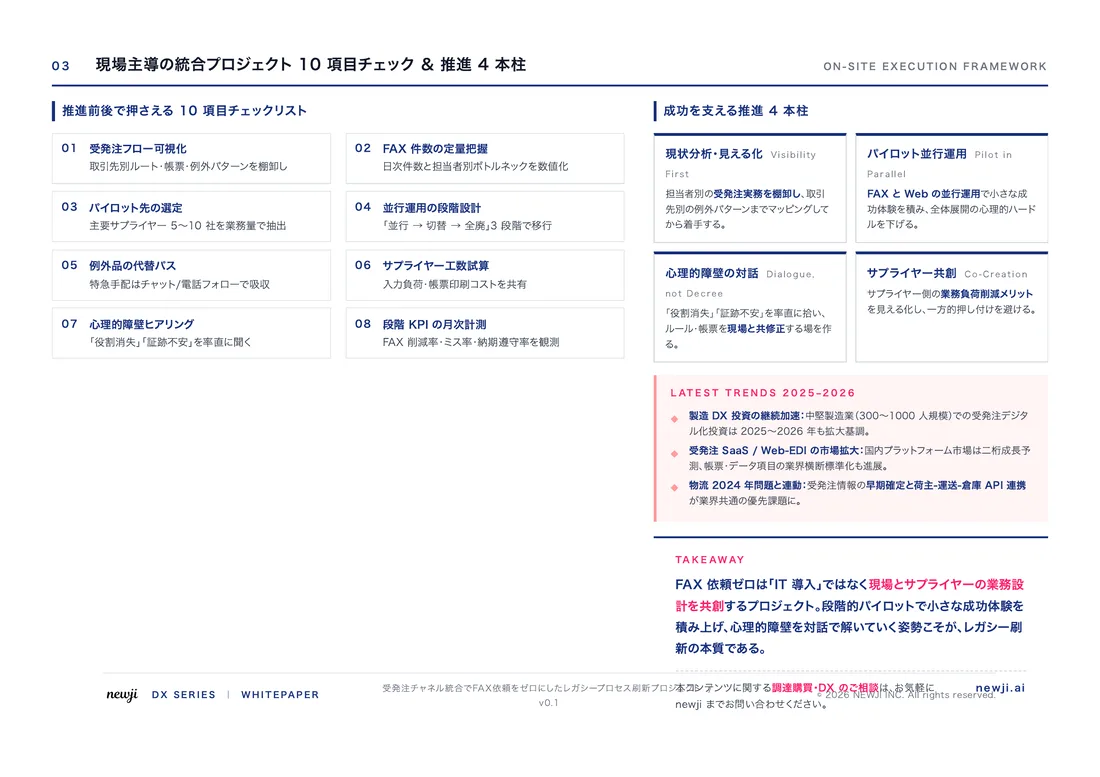
- お役立ち記事
- Basics and practice of image processing programming using OpenCV3.2
スタートアップから大手まで。
調達・受発注をAIで標準化。
相見積比較も進捗管理もAIが下支え。取引先は招待で完全無料。

Basics and practice of image processing programming using OpenCV3.2

目次
What is OpenCV?
OpenCV, short for Open Source Computer Vision Library, is a comprehensive open-source library.
It aids in computer vision tasks.
It comes with a wide range of tools that help in processing and manipulating images and videos.
Popular among developers and researchers, OpenCV is accessible and versatile.
The library supports multiple programming languages like C++, Python, and Java, making it suitable for various applications.
Why OpenCV 3.2?
OpenCV has been around for quite some time, constantly evolving with each version.
OpenCV 3.2 is notable for many reasons.
Released with several updates and improvements, this version brings more stability and new features.
For programmers keen on the simplicity of older interfaces but wanting newer functionality, OpenCV 3.2 is a valuable choice.
Compatibility with various operating systems and ease of integration has made it a favorite among enthusiasts and professionals.
Setting Up OpenCV 3.2
Before diving into programming with OpenCV, setting up your environment is crucial.
Let’s look at how to install OpenCV 3.2.
Installing OpenCV
First, decide the programming language you will use.
For Python, which is highly recommended for beginners, you can use pip, the package installer for Python.
Simply run:
“`
pip install opencv-python==3.2.0.0
“`
For those using C++, download the OpenCV 3.2 archive from the official website.
Extract the files and configure the build using CMake.
This process can vary slightly depending on your operating system.
Verify Installation
Regardless of the programming language, it’s essential to verify if OpenCV is correctly installed.
In Python, you can do this by opening a command prompt or terminal and typing:
“`python
import cv2
print(cv2.__version__)
“`
This should display 3.2.0, confirming successful installation.
Basic Concepts in Image Processing
Understanding image processing is the foundation for programming with OpenCV.
Let’s explore some key concepts.
Pixels and Color
An image is composed of small units called pixels.
Each pixel has color information, typically stored in RGB (Red, Green, Blue) values.
In RGB, each color channel can range from 0 to 255, allowing for a wide range of colors.
Grayscale Images
In some applications, color information isn’t necessary.
Grayscale images simplify processing by having only intensity information.
Each pixel’s value varies from 0 (black) to 255 (white).
Image Resolution
Image resolution refers to the number of pixels in an image.
Higher resolution results in more detail.
However, it also requires more processing power and memory.
Getting Started with OpenCV Programming
Now that you understand the basics, it’s time to get your hands dirty with some practical examples.
Reading and Displaying an Image
Let’s begin by reading and displaying an image using Python.
“`python
import cv2
# Read the image from a file
image = cv2.imread(‘path_to_your_image.jpg’)
# Display the image
cv2.imshow(‘Displayed Image’, image)
# Wait for a key press and close the window
cv2.waitKey(0)
cv2.destroyAllWindows()
“`
This snippet uses OpenCV’s imread() function to read an image and imshow() to display it.
Ensure the specified image file path is correct.
Converting to Grayscale
Converting an image to grayscale is another fundamental task.
It reduces complexity and is often a pre-processing step.
“`python
# Convert the image to grayscale
gray_image = cv2.cvtColor(image, cv2.COLOR_BGR2GRAY)
# Display the grayscale image
cv2.imshow(‘Grayscale Image’, gray_image)
cv2.waitKey(0)
cv2.destroyAllWindows()
“`
The function cvtColor() performs the conversion, making further processing easier.
Basic Image Manipulations
OpenCV offers various functions for manipulating images, such as resizing and rotating.
“`python
# Resize the image
resized_image = cv2.resize(image, (400, 400))
# Rotate the image 90 degrees
rotated_image = cv2.rotate(image, cv2.ROTATE_90_CLOCKWISE)
# Display resized and rotated images
cv2.imshow(‘Resized Image’, resized_image)
cv2.imshow(‘Rotated Image’, rotated_image)
cv2.waitKey(0)
cv2.destroyAllWindows()
“`
These functions are particularly useful when working with images of different sizes or orientations.
Advanced Image Processing Techniques
After mastering basics, delve into more complex techniques to augment your skills.
Edge Detection
Edge detection is vital for identifying object boundaries within images.
The Canny edge detector is commonly used in OpenCV.
“`python
# Perform edge detection
edges = cv2.Canny(gray_image, 100, 200)
# Display the edges
cv2.imshow(‘Edges’, edges)
cv2.waitKey(0)
cv2.destroyAllWindows()
“`
This technique is particularly useful in object recognition and computer vision applications.
Face Detection
OpenCV simplifies tasks like face detection with pre-trained classifiers, such as the Haar Cascades.
“`python
# Load pre-trained classifier
face_cascade = cv2.CascadeClassifier(cv2.data.haarcascades + ‘haarcascade_frontalface_default.xml’)
# Detect faces
faces = face_cascade.detectMultiScale(gray_image, 1.1, 4)
# Draw rectangles around faces
for (x, y, w, h) in faces:
cv2.rectangle(image, (x, y), (x + w, y + h), (255, 0, 0), 2)
# Display the result
cv2.imshow(‘Detected Faces’, image)
cv2.waitKey(0)
cv2.destroyAllWindows()
“`
This advanced functionality demonstrates OpenCV’s power in real-world applications.
Conclusion
OpenCV is a versatile and powerful tool in the realm of image processing.
Once you grasp the basics of OpenCV 3.2, you can progress to complex tasks with ease.
The wide range of functionalities allows for creativity and problem-solving.
Harnessing this library unlocks opportunities for innovative solutions.
With practice, you will master image processing programming, translating ideas into reality.
この記事の理解を深める
無料ホワイトペーパーをプレゼント
製造業の現場で使える実務資料(PDF)を無料でお届けします。"こんな資料が届きます" ↓ 下のボタンからどうぞ。
PRODUCT — 製造業向け 調達・受発注クラウド
この記事の課題、
newji で解決しませんか?
newji は、製造業の調達・受発注に特化したクラウド/AIエージェント。見積依頼・発注書作成・進捗管理・承認をひとつの画面に集約し、AIが比較と異常検知を担当。最後の「GO」だけ人が押す仕組みです。
- 見積〜発注〜納期を一元管理。催促・転記のムダをゼロに
- AIが相見積もり比較と異常検知。あなたは判断だけに集中
- 取引先は「招待」で完全無料。自社コストだけで取引先ごとデジタル化
※ 取引先から招待された企業様は完全無料でご利用いただけます

